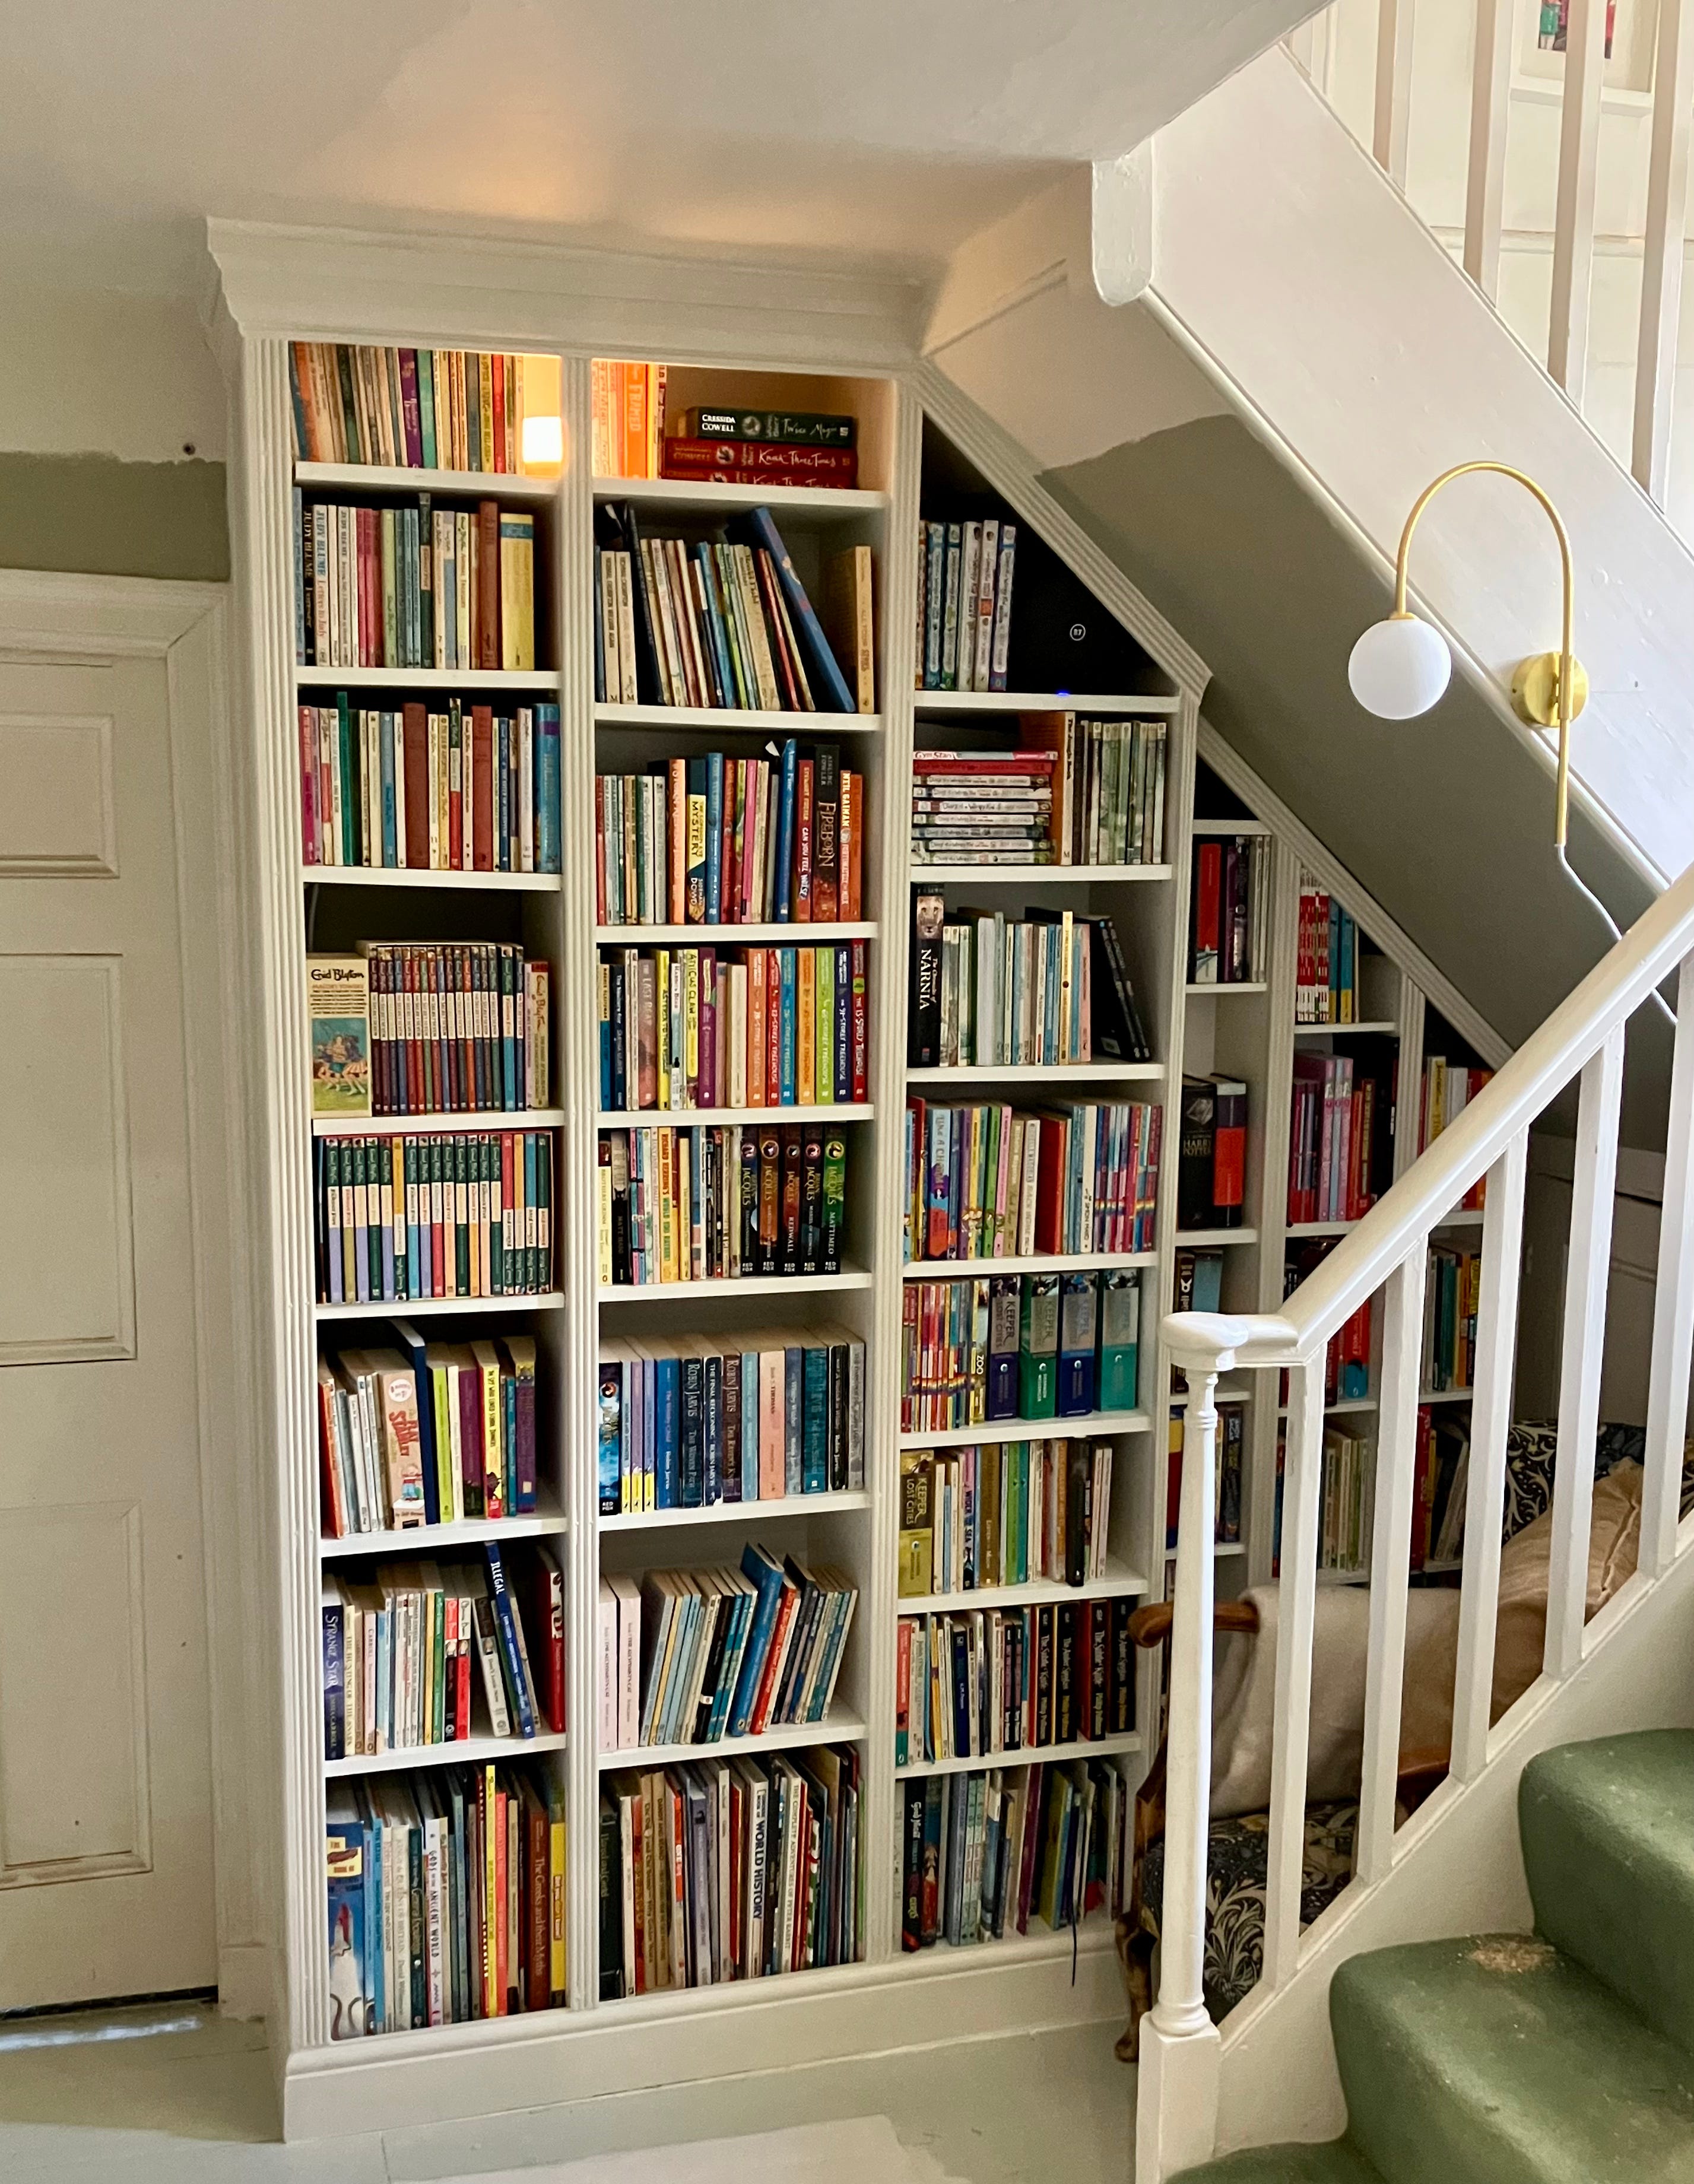
Yesterday I tweeted about my latest DIY venture: building some built-in book storage in a tricky area, using Ikea Billy bookcases. I was ridiculously proud of them, and, like a child wanting to show her mother her latest creation, I wanted to show someone what I’d made, so I put up a picture on Twitter. Thousands of you were so kind, retweeting and replying with very lovely comments - so I thought I’d jot down how I did it, and how much it cost, in case anyone else finds it useful.
I know that this newsletter is becoming a bit of a mish-mash of seemingly unrelated issues: feminist commentary on how men and women occupy public space; the history of women’s sport; women’s trail-running; camping hacks; Lao women’s textiles; widowhood and grief; and now DIY. I suppose the nice thing (for the writer - maybe not so much for the subscriber!) about a newsletter is that it’s MINE - there’s no commissioning editor, obvs - so it can be a reflection of what interests me at any given moment. But I think there are also lines of continuity between all these issues, which, at some point, I might explore in longer form: how, in the wake of losing my husband, words and intellect have not been as sustaining as I might have thought, and I’ve found greater satisfaction in practical things involving sensation (and particularly involving perceptions of beauty). I do think there’s a potential feminist angle here, which links these practical things with my other interests: about the in/visibility of women’s hands-on work, and about the benefits of self-sufficiency for women. And I’m also interested in how the trauma that many men inflict on very many women forces us into a state of retreat - I’ve certainly become a bit of a hermit since Pete died, occupying myself with jobs around the house, or around my tent/campervan. But, when this happens on a mass scale - women, all over the world, being damaged by men to such an extent that public engagement and political activism and sheer contact with other people becomes far too much to contemplate - well, this is one way in which men successfully bring an anti-feminist backlash to fruition, isn’t it?
Now, on to bookcases.
I wanted to create a “book nook” for my daughters, with enough space for a comfy armchair as well as bookcases containing all our kids’ books. The space I had in mind was awkward: an under-the-stairs alcove, running between a bedroom doorway and a cupboard, with a partially sloping ceiling, uneven early-eighteenth-century floorboards, and a wonky lath-and-plaster ceiling. Even more awkwardly, there’s a door at the back of the alcove, leading into an understairs storage cupboard which I wouldn’t need to access often, but might occasionally need to do so. The cupboard door needed to be able to be opened partially, to retrieve smaller items - and, very occasionally, fully - so the bookcases closest to the cupboard door had to be shallower than the rest, and, if necessary, removable.
Years ago, in the Before Times, we’d had some built-in bookcases made for us by a local carpenter. The finished product was beautiful, but I remember walking in, halfway through the project, and being disappointed that the carcase looked exactly like Ikea Billy bookcases. So, this time, I wondered if I could make built-in bookcases, using Billys as the skeleton. I measured up, and worked out that the space could just about fit 3 X 40cm Billys, and 3 20cm-width Gnedbys (CD towers). The shallower width of the Gnedbys would allow me to open the cupboard door most of the way. Here’s what it the alcove looked like with the unaltered bookcases in situ.
To make the Ikea carcases into beautiful built-in bookcases, these are the steps I followed:
First, I pulled up the manky carpet - to reveal gorgeous floorboards dating from Queen Anne’s reign. But god, they needed a lot of love and care, which is a whole other story.
Then I set about adapting the Billys to the space. I used shims and wooden wedges under the cases, and a laser spirit level, to make sure that the bookcases were level on my uneven floorboards. Then, after lots of careful measuring, I realised that one Billy had to be shortened in height, to fit under the sloping ceiling, so I took it apart and used my circular saw to cut it down to a 180cm height. Another Billy would have to be slimmed down, from its 40cm width to a 35cm width, to fit in the space between the doorway and the . The Gnedbys would all need vertically cutting down to size too, to fit under the sloping ceiling. Measuring and cutting the wood was the easy bit: I used a Makita circular saw and guide rail. The trickier bit was working out a way to fit the bookcases back together again, because the top shelf has an important structural role in holding the thing together by means of dowels, cam dowels and cam locks. With each of the bookcases that were being shortened, height wise, I had to drill new holes on one upright section, into which I could screw/bash dowels and cam dowels, so that the structural shelves could slot onto them. With the bookcase that was being slimmed down, I had to drill new holes into the 3 horizontal shelves and the horizontal kickplate, so that they could be fitted onto the existing dowels and cam dowels on the upright sections.
I put the adapted Billys into the space, and measured the alcove again. I had to get my head around what further structural bits of wood I would need to attach, and which bits of trim would be necessary to disguise the carcase and make it look beautiful. This stage took the longest: I drew lots of diagrams, and spent a lot of time on mouldings websites, working out what widths of trim would work, and what they’d need to be attached to.
This is how I proceeded:
i) I wanted cornicing along the top of the bookcase that didn’t protrude too far and wasn’t too flashy - because the bookcase was being built right next to the architrave of a bedroom door (so I didn’t want to overcomplicate things), and because the cornicing would be running right into a bit of simple pre-existing trim (where the ceiling met the bannisters of the stairs). The cornicing needed to be quite tall, because the ceiling and floors at this point are really wonky, so when the bookcase was level, there was a much bigger gap between the top of the bookcase and the ceiling at one end than the other end. This type of cornicing, which is fairly simple in appearance, tall, but shallow, fitted the bill perfectly.
ii) The floor-to-ceiling measurement was 223.8cm, but the tallest Billy was 202cm. So I needed to build a top section to sit on top of the 2 tallest Billys, onto which the cornicing could be attached (and which would also give me an extra small shelf). I bracketed this to the Billys and I also bracketed it onto the walls.
iii) I wanted to attach a continuous floor-to-ceiling piece of wood to the end of the bookcase, to bring it right up to the bedroom doorway, and so that, when looking at the bookcase as you walk through the hallway, you see continuous wood - rather than 2 bits of wood joined together.
iv) The skirting around the rest of the hallway is dead simple Torus profile skirting, and this fit the height of the kickplate on the Billys, so I bought some with a height of 11.9cm.
iv) The thickness of each piece of wood used in an Ikea Billy is 18mm, so, where there are 2 Billys put next to each other, I would need trim (running vertically) of a 36mm width to fully disguise the join between the two bookcases. BUT, there is one point on my bookcase where the shortened Billy is put next to a shortened Gnedby, and the difference in shelf depth means that there is no direct join between two bookcases - so here I would need trim of 18mm width. So I needed to find matching trim that came in both a c.36mm width and a c.18mm width. Reeded trim was ideal, as it came in 3 different width sizes.
I bracketed the Ikea carcases to the wall, built the extra top shelf on top of the two full-height bookcases, and attached the floor-to-ceiling length of wood to the left-hand end of the bookcase.
I then set about attaching the trim. I started with the skirting, using a mitre saw to cut the corners, and attaching it to the bookcases with wood glue and screws. Then I did the cornicing, fixing it onto the extra top self in the same way, and using a laser spirit level to make sure that it was perfectly horizontal. I’d done plenty of plans showing the rough measurements for the rest of the trim, but I waited until I’d got all of this in situ before remeasuring and cutting the trim - and it was worth waiting, because the weight of the bookcases had subtly shifted the floorboards in places, so it was much better to measure the trim in its actual place (rather than in my diagrams). I fixed 39mm-width reeded trim to the vertical bits where there were 2 Ikea Billys put next to one another, and 19mm trim to the vertical sections where there was only 1 Billy/Gnedby, without a direct join to another case). Then I attached 2 vertical runs of 39-mm reeded trim to the left-hand end of the bookcase, just for decoration. I cut more trim to run down the sloping ceiling, and I cut the vertical bits of trim at a 45degree angle so that this sloping section would fit onto them.
Then I got a LOT of decorators’ caulk, and used it to fill in, and smooth out, the gaps and joins - the gaps between the skirting and floor, and between the cornicing and ceiling, and the joins between 2 or more bits of trim. The smaller bookcases are removable, so I didn’t caulk between the skirting and bookcase in that section.
Then I primed (Zinsser BIN is great primer for Billys) and painted, and voila!
Now, obviously, I am not an expert at all this! I’m sure there are some things I’ve done here that might be frowned upon by those in the trade. But I enjoyed this project: the problem-solving element, the research, learning new skills (I’d never mitred before), and working with beautiful wooden trim. And I’m crazily pleased with the end result! Total cost was about £120 in Ikea bookcases, £500 in trim (gulp - but there were minimum orders in lots of the styles, so I have tons left over - which I’ll use later in the year when I tackle our main library room)), £5 in caulk, £50 in primer (but there’s lots left, which I’ll use for a different project) and 2 days in time. I hope this post helps someone else who might be contemplating something similar.
I think you should write about anything you want. You have a gift that makes whatever you turn your attention to interesting.
Amazing! You and the bookshelf, amazing! I’m hopeless at DYI - fortunately, my husband is very good at it, but I often wish I could put things together myself.